How do you change fuel filter? Save this tutorial and you’ll get it done easily
Replacing the fuel filter is part of regular vehicle maintenance. Regularly replacing the fuel filter can extend the life of the engine and improve fuel efficiency. The following are detailed replacement steps.

1. Preparation
1.1 Required Tools and Materials
New Fuel Filter: Make sure to choose a filter that matches your vehicle model.
Toolbox: Contains basic tools such as wrenches and screwdrivers.
Oil pan: Used to catch any fuel that may leak.
Gloves and goggles: Protect your hands and eyes.
Towel or rag: Used to wipe spilled fuel.
1.2 Safety Preparation
Make sure the vehicle is turned off: Before starting the operation, make sure the vehicle is turned off and the key is removed.
Decompress the fuel system: In some models, the fuel system is pressurized, and you need to perform decompression operations according to the model manual.
Well-ventilated environment: When replacing the fuel filter, fuel will evaporate. It is recommended to operate in a well-ventilated place to avoid inhaling harmful gases.

2. Replacement Steps
2.1 Locate the fuel filter
The location of the fuel filter varies depending on the model and is generally found in one of the following locations:
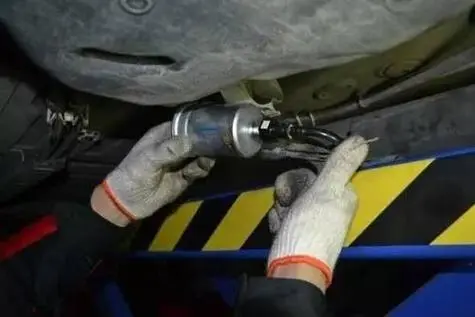
Under the chassis: near the fuel tank and fuel pump.
In the engine compartment, look along the fuel line.
Under the rear seat: The fuel filter of some models may be installed near the fuel pump under the rear seat.
2.2 Remove the old fuel filter
Locate the fuel filter: Once you have identified the fuel filter’s location, use a wrench to loosen the bolts or clips securing the filter.
Disconnect the fuel line: Wrap a rag around the connection of the fuel line to prevent leakage, and then gently pull out the line connector.
Remove the filter: Carefully detach the old fuel filter from the bracket and position it in the oil pan to capture any spilled fuel.
2.3 Install the new fuel filter
Check the new filter: Before installing the new filter, verify that it matches the old filter and ensure there is no damage.
Connect the fuel line: Attach the fuel line to the new filter, ensuring a secure connection with no leaks.
Secure the filter: Install the new filter onto the bracket and secure it with bolts or clips.
2.4 Inspection and Testing
Check the connection points: Ensure all connection points are secure and there are no fuel leaks.
Start the engine: Begin the vehicle’s engine, inspect for any irregularities, and be vigilant about any fuel leaks near the filter.
Test Drive: Conduct a brief test drive in a secure environment to verify that everything is functioning normally.

3. Subsequent Maintenance Suggestions
Check the condition of the fuel filter regularly. It is generally recommended to replace it every 15,000 to 30,000 kilometers. For specific replacement cycles, please refer to the vehicle user manual or consult a professional technician. If the vehicle feels sluggish or lacks power when accelerating, it may be due to a clogged fuel filter that needs timely replacement.

4. Notes
Handling Old Filters: The old fuel filters that have been replaced should be disposed of in compliance with local environmental protection regulations and should not be discarded casually.
Avoid fireworks: Refrain from using open flames and exposing the device to high temperatures during operation to prevent the fuel from igniting and causing fires.
Choose the right fuel filter: Use genuine filters recommended by the manufacturer. Poor-quality filters may affect the normal operation of the fuel system.


